martes, 1 de julio de 2025

openwrt-reinstall revisited, now with more power :-)

It is almost four years since I wrote about openwrt-reinstall. That was the first public version of this script that tries to get openwrt updates a little bit closer to the big distros trying to achieve something similar to what we get when we do an apt dist-upgrade or similar.

I'm talking about an script that will reinstall all your packages when you do a sysupgrade of your openwrt to jump to the newest version and thus allowing you to do the jump without loosing your functionalities or your configs. Personally this has been the biggest problem on OpenWRT for me since I started playing with it back on the Linksys WRT, the Foneras and all those routers that now belong to our beloved museum :-) and now with openwrt-reinstall I really love to update, please read the original article to know more about it.

Anyway, I'm writing today to announce that I have added two new parameters:

  • check compares the package status that we have specified on our reinstall.conf with the current package status and will tell you if you have installed any new package so that you can add it to reinstall.conf and have it automatically reinstalled
  • chen calls check and then calls enable so that you get both the info from check and you enable the service

So the idea is that before you do a sysupgrade you run: /etc/init.d/reinstall chen and you get the info on the packages you have added to your system since your last reinstall and enable reinstall so that after you add those new packages to /etc/reinstall.conf and you run sysupgrade /tmp/openwrt-whatever-sysupgrade.bin you end up with your updated system and everything configured like it was before.

If this is your first time running reinstall and you do a "check" it will let you know all the packages you have manually installed and if you do a "chen" it will also enable itself to do the the reinstall of the packages you want. The list of the packages you want should be added to /etc/reinstall.conf. So, after you reboot into your updated OpenWRT (24.10.2 was released last week) it will install those packages and reboot again into your updated system which will be just like you wanted. Just make sure you update reinstall and use the latest version and configure it to fit your needs ;-)

As always, I hope you enjoy it and if you have any sugestions you can write them on the comments or even better through bugs or pull requests or whatever on github.

viernes, 13 de junio de 2025

Viviendo en wayland desde el login

Desde que publiqué la entrada anterior he estado usando la sesión de xfce en wayland en un par de máquinas y la verdad es que estoy muy contento con como va la cosa, así que me ha pillado un poco el tema y he seguido con un run run en la cabeza hasta que haciendo una búsqueda (no en google sino en apt) di con la respuesta.

El run run era una pregunta de si no había ningún "display manager" para wayland, es decir, sabía que el gdm iba nativamente sobre wayland, pero montar gdm con todas las dependencias que tiene para tener sólo un login... no me había molado, por eso comenté en el artículo anterior que podemos arrancar directamente el xfce en wayland desde el login de la consola. Pero claro... eso es un poco "cutre", igual no es esa la palabra pero me entendéis, hoy todo el mundo quiere todo gráfico, por eso tenemos en Debian un instalador gráfico que es igual que el de modo texto pero... es gráfico X-)

La pregunta que le hice a apt debió de ser algo como...

$ apt-cache search wayland display manager greetd - minimal Wayland login manager tan concreta fue su respuesta que no pude evitar instalar greetd y tirar del hilo, me llevó a que va a juego con los "greeters" y entre ellos me quedé con:
nwg-hello - GTK3-based greeter for the greetd daemon
lo que pasa es que los greeters como nwg-hello necesitan por debajo un compositor, uno que me gustó mucho porque es muy sencillo y para un greeter va muy bien es cage, si queremos arrancar nwg-hello desde greetd usando cage tenemos que editar /etc/greetd/config.toml y poner
command = /usr/bin/cage /usr/bin/nwg-hello
sencillo, ¿no?

Si te gusta el look explosivo que trae nwg-hello pues genial, yo lo quería un poco más sobrio y con el look de Debian, así que en /etc/nwg-hello hice lo que dice el README que está allí, copié los default y edité el nwg-hello.css para cambiar la imagen de fondo dejándola tal que así:

background-image: url("/usr/share/desktop-base/active-theme/login/background.svg"); background-size: 140% 140% El cambio del tamaño a 140% es para que al agrandar la imagen el logo de Debian 13 se vaya más a la derecha y quede como al medio de la segunda mitad de la pantalla, donde no está la parte de login.

Puestos a investigar y dado que el compositor que uso luego en xfce es labwc me puse a buscar en la red si podíamos usar labwc para arrancar el nwg-hello y encontré esto donde se explica todo perfectamente, pero que resumiendo sería poner en /etc/greetd/config.toml:
command = "labwc --config-dir /etc/nwg-hello/labwc-config"
y crear ese directorio que configuramos con esa linea, que no existe, y dentro de él creamos el fichero autostart con este contenido:
exec /usr/bin/nwg-hello; /usr/bin/labwc --exit
y listo.

Ahora si que me ha quedado una sesión fully wayland y potita, y el overhead para la sesión es sólo el greetd, no se queda nada más por ahí corriendo, así que lo he puesto hasta en el netbook, aunque ahí hubo que tocar un poco más el css para que entrase todo en la pobre resolución de la pantalla, pero vamos, bajar los paddings de 12 a 5 y descomentar los labels del welcome y clock para que las fuentes sean más pequeñas.

A disfrutarlo.

martes, 20 de mayo de 2025

Wayland en Debian 13 (Trixie) usando xfce

Hace ya tiempo que quería pasar alguna de mis máquinas a Wayland pero nunca me ponía porque los entornos de escritorio que soportan Wayland son muy pesados y sway y sus amigos no me atraían mucho, la verdad.

Sin embargo recientemente, mientras probaba la que será la Debian 13 (Trixie, que todavía no ha salido, pero que ya ando probando), he tenido problemas con mi viejo netbook, y me vi probando algunas de las alternativas sobre Wayland y entre ellas y para mi sorpresa, en Trixie tendremos xfce 4.20, cuyo soporte de Wayland es todavía un poco pobre, pero que combinado con labwc creo que puede dar una buena experiencia sobre Wayland.

Vayamos al tema, tendremos que instalar los paquetes xfce4 labwc, eso está claro, añadimos algunos extras como xfce4-goodies xfce4-power-manager swayidle swaylock swaybg mako-notifier. La sesión de xfce para Wayland viene configurada ya en los paquetes y quedará disponible para su arranque desde los display managers (aunque ahora mismo parece que en lightdm no funciona, si lo hace en sddm y gdm3) o bien podemos arrancarla directamente desde la consola como se hacía antiguamente con las X con startx, como me recordó un viejo profile heredado desde sabe dios que versión de Debian que decía...

case "`tty`" in
    /dev/tty[1-4]) exec startx
esac

Pues como la sesión de xfce en wayland se arranca como startxfce4 --wayland podemos poner esto en lugar del startx o bien arrancarlo a mano, con un alias, ...

Uno de los primeros problemas que afronté fue la configuración de teclado, suelo usar teclado español y si bien encontré enseguida que la configuración que usa xfce para labwc está en el directorio .config/xfce4/labwc y en concreto podía poner el teclado en castellano poniendo en el fichero environment la variable XKB_DEFAULT_LAYOUT=es y ejecutando labwc -r para recargar, el problema está en que este fichero se genera automáticamente cada vez que se arranca xfce, así que se sobreescribía todo el rato, me costó bastante dar con este bug en el que se describe como workaround el crear un fichero con nombre lock en dicho directorio para evitar que xfce sobreescriba nuestra configuración.

Una vez conseguido esto empecé a configurar las cosas como a mi me gustan, normalmente haciendo todo ya desde la configuración gráfica de xfce, incluso cuando se trató de añadir el "salvapantallas" que bloquease la sesión al cabo de un rato indicando en la configuración de la sesión que quería ejecutar un nuevo programa con este comando que venía como ejemplo en alguna de las múltiples webs de ayuda de labwc:

swayidle -w timeout 300 'swaylock -f -c 000000' timeout 600 'wlopm --off \*' resume 'wlopm --on \*' before-sleep 'swaylock -f -c 000000'

O lo mismo pero para poner el fondo de pantalla:

swaybg -i /usr/share/desktop-base/active-theme/wallpaper/contents/images/1920x1080.svg

Una cosa más, que sí tuve que tocar a mano, porque la parte del teclado va todo sobre labwc, fueron los atajos de teclado, los keybindings que se definen en .config/xfce4/labwc/rc.xml y que quería cambiar para añadir un atajo a la ejecución de comandos con control+alt+espacio usando:

    <keybind key="C-A-space">
      <action command="xfce4-appfinder --collapsed" name="Execute">
    </action></keybind>

Básicamente eso fue todo, para estar por así decirlo en pañales esta primera versión de xfce con soporte de wayland... la verdad, todo bastante bien, sobre todo la economía de memoria de todo esto corriendo en mi viejo netbook con 2 gigas de ram ahorrándome display managers y todo tipo de cosas que no necesitaba para nada, mucho mejor que mi viejo setup que ya era minimalista, pero llevaba las X con su display manager, ... ahora no voy a decir aquello de que "es alucinante y vuela" ;-) porque ya sabemos que ese viejo Atom con un navegador moderno nunca va a volar, pero... va mucho mejor :-)

miércoles, 11 de diciembre de 2024

Printing from Android to cups, so simple! Imprimiendo desde Android, ¡tan fácil!


 I never had a real need to print from the Androids, but as phones and tablets gain more atention at home... I finally had to look it up. It seemed difficult, with old apps that didn't work out and things like that.

That was until I read an article explaining how to print on Apple related stuff with bonjour protocol involved, ... something that required me to install avahi and some other stuff that I don't really like, but that explained that you can print from Android selecting from the menu either share to a printer or directly print.

So I thought... if you can select print and then select a printer to add and add it specifying as IP address the url for your printer:

ipp://ip.of.server/printers/printername

Well, that works and after adding the printer you can select it and choose the printing options and hit the printer icon to get whatever you want printed :-)


Nunca tuve la necesidad de imprimir desde Android, pero según los móviles y las tablets van ganando más atención por casa... Pues tuve que empezar a mirarlo. Parecía difícil, con apps viejas para android que no funcionaban y cosas así.

Pero todo cambió cuando leí un artículo explicando como imprimir en cacharrería Apple con protocolos bonjour involucrados, ... esto implicaba instalar avahi y algunas otras cosas que no me apetecían mucho, pero que explicaban que se puede imprimir desde Android seleccionando desde el menú o bien compartir con una impresora o directamente imprimir.

Así que pensé... si puedes seleccionar imprimir y luego seleccionar una impresora a añadir y añadirla especificando como dirección IP la url de la impresora:

ipp://ip.del.servidor/printers/nombredelaimpresora

Pues bien, eso funciona y luego de añadir la impresora puedes seleccionarla y elegir las opciones de impresión y pulsar el icono de la impresora para que se imprima eso que querías imprimir :-)


jueves, 9 de noviembre de 2023

Freeing your phone from Linux (with heimdall for Samsung)

When I wrote about updating baseband I realised that I hadn't written about how to install an aftermarket ROM, so... here we go.

The typical journey of installing an aftermarket ROM Like LineageOS, crDroid, ... which means replacing the propietary ROM of your phone with a hopefully free OS that is updated more frequently and for a longer time, starts with unlocking your mobile phone's bootloader, that depends on your maker, or even your model, so you must find an specific guide on that, typically it means enabling developer mode oand then looking for a

OEM unlock option.

Then you must install a recovery, you have to choose the specific one for your phone from all the available ones. Both LineageOS and crDroid have their own simple recoveries, and you have of course the good old TeamWin, OrangeFox, ... you just need to find the one you like and is available for your phone and then we install it.

After installing the recovery we have half the work done, as we can boot into it and from there we can flash our chosen OS and then the Google Apps or maybe you prefer to choose microG instead.

But... how do we install the recovery... on some devices you have a fastboot bootloader, there you must use the fastboot tool doing something like:

fastboot flash recovery recovery.img either if you are on Windows or Linux, but for Samsung devices... you either use Samsung tools for Windows like the old Odin, or if you are on Linux... yes, you need the latest version of heimdall (2.0.2 as I write this).

Once you have the latest heimdall installed we get the phone to start the bootloader or download mode and plug it to our computer, there we can run

heimdall flash --VBMETA vbmeta.img --RECOVERY recovery.img where the vbmeta image is specific for your model and is needed so that we are allowed to install our recovery and our chosen OS. One thing about heimdall... you can use the --no-reboot option, and so the phone won't reboot after heimdall exits, however, on modern phones and at least on heimdall versions up to and including 2.0.2, you won't be able to run heimdall again to do some other task without rebooting, it will fail, so... you must reboot anyway.

After installing the recovery we must boot it, not the OS, if you boot to the OS just once, it will restore the old recovery and you'll have to start all over, so... after you execute heimdall, make sure you press the right keys to boot into recovery.

That's it, I know it sounds a bit complicated, but, if you do things right, you can forget about Samsung's crap forever and enjoy your chosen system for a hopefully long time. I hope this new experience with your phone pleases you, enjoy it!

viernes, 27 de octubre de 2023

Updating baseband on Samsung devices when you are running aftermarket ROMs.

Some time ago I wrote about heimdall and how you could flash a Samsung official ROM using it. This time we'll be talking quite about the opposite.

When you are running an aftermarket ROM (one that is not the one from the maker of your phone) like an official LineageOS or crDroid ROM you get regular updates from them, but what you typically don't get is updates for the baseband.

The baseband is the software that runs the communication processor or modem, it is an important part of your phone as it is in charge of all the communications, so having it updated is important, not only because of the functionalities, but also because of the security issues.

So... the problem here is... how do you update your baseband now that you are no longer running your phone's official ROM? You could backup and flash your updated Samsung official ROM and then reinstall your favourite ROM and restore from backup, but that's a nonsense, so...

How about flashing just the modem software and leave your favourite ROM untouched?

Well, for that we can rely on heimdall, just make sure that you run the latest version of heimdall (2.0.2 as I write this). First you must download the Samsung updated ROM from your favourite site, we need the CP archive, something like...

CP_A705FNXXU5DWB1_CP23709798_CL24363203_QB62257661_REV00_user_low_ship_MULTI_CERT.tar.md5

for the A70, note that while this ends on md5 it is just a normal tar file, then extract the files from it, in this case modem.bin.lz4 and uncompress it with unlz4 and you'll get the modem.bin file that you must flash, now we just need to find where we need to flash it, we look for the name of this file on the heimdall print-pit output and we'll get the Partition Name, in this case MODEM, so we run...

heimdall flash --MODEM modem.bin

That's it, enjoy your new baseband ;-)

domingo, 9 de octubre de 2022

Windows 11 en una máquina vieja vía libvirt en Linux

Entre los requirimientos de Windows 11 están una CPU moderna, arranque EFI seguro y un dispositivo de seguridad TPM versión 2.0. A continuación os comentaré como lo instalé sin trucos en una máquina virtual dentro de una máquina que no tiene ni TPM ni arranque seguro EFI, así que el único requerimiento que cumplía era el tener una CPU algo moderna, con virtualización hardware, claro.

Para poder probar cosas con el Windows 11 en el trabajo he querido instalar Windows 11 como siempre hago con los Windows, es decir, en una máquina virtual dentro del sobremesa, hasta ahora siempre lo he hecho con VirtualBox, es cómodo y cumplía con lo que yo necesito.

Sin embargo en este caso, si queremos instalar Windows 11 sin trucos, necesitaremos un dispositivo de seguridad TPM, que no existe en VirtualBox, así que... he explorado un poco el mundo de libvirt usando por debajo KVM, que sí que nos permite usar un TPM software y el resto de cosas que necesita Windows 11 para funcionar.

He utilizado los paquetes de Bookworm (ahora en testing mientras no se convierte en la nueva estable) para contar con las últimas versiones y no tener que andar haciendo las cosas "a mano" editando los XML y tal, con las versiones de Bookworm se puede hacer todo en plan gráfico sin problema, con versiones anteriores igual también se puede, pero en algunas hay que tocar los XML a mano.

La cosa para mi ha sido instalar por un lado la parte de libvirt, instalé estos paquetes: virt-manager virt-viewer libvirt-daemon-driver-qemu libvirt-daemon-system libvirt-daemon-system-systemd libvirt-daemon-config-nwfilter libvirt-daemon-config-network libvirt-clients gir1.2-spiceclientgtk-3.0

Por otro lado para cumplir con los requerimientos del Windows 11 (TPM y arranque EFI) instalé: swtpm-tools ovmf

En algunas pruebas en alguna máquina muy "barebones" no tenía un polkit adecuado así que le instalé: lxpolkit Esto no será necesario en sistemas normales con interfaz gráfica ya que ya tendrán instalado un polkit, sino... el propio virt-manager os lo indicará con un error, sino... arrancarlo con "--debug"

Entre los requerimientos de Windows 11 están la CPU, que tiene que ser moderna y que el arranque sea EFI, por ello definiremos una nueva máquina en el virt-manager poniendo de arranque la ISO del Windows descargada de MS, dejaremos que detecte el operativo (detecta Windows 10, por ahora no tienen 11, pero nos sirve) y justo al final, antes de darle a finish, activaremos "Customize configuration before install" y ahí le ponemos en "overview" tendremos que cambiar el apartado "firmware" de BIOS a UEFI con arranque seguro (secboot), además iremos a la ventana "CPUs" y eligiremos en "Configuration" la opción "host-passthrough".

Si le dimos a "apply" en las opciones podemos volver a "overview" y comprobar en el xml que nos queda algo como esto:

machine=pc-q35-7.1 cpu mode='host-passthrough' ... firmware UEFI x86_64: /usr/share/OVMF/OVMF_CODE_4M.secboot.fd

El otro requerimiento que tiene Windows 11 y que no suelen cumplir las máquinas menos modernas es el TPM, pero al ser una máquina virtual usamos el TPM software que hemos instalado y listo. Para esto añadimos a la máquina un dispositivo nuevo de tipo TPM y modelo TIS, y listo, ya podemos darle a "Begin installation".

Esta configuración de máquina es con la tarjeta gráfica qxl, cuando terminemos la instalación de Windows será conveniente instalar en el Windows 11 las spice guest tools que podemos descargar de spice-space.org para tener un buen soporte del esta y el resto del hardware.

Una vez instalemos eso apagamos la máquina y en el virtual-manager en la ventana de la máquina virtual Windows 11, seleccionamos "view", "scale display" y marcamos "autoresize vm with window"

Listo, con esto Windows debería reconocer todo el hardware y hacer escalado de la pantalla al tamaño de nuestra ventana.

martes, 12 de julio de 2022

Programming Retevis RT46

So... some time ago we bought a pair of RT46 for the children, they work pretty well, however we found out on the instructions manual that we can change a lot of parameters through software programming, like disabling CTCSS/DCS so that we can hear other radios that don't have it enabled.

The first thing was to get the software from Retevis. They sent me an exe that looks to be compiled for Windows XP, bad luck there, but we have an old windows tablet around that maybe could run this.

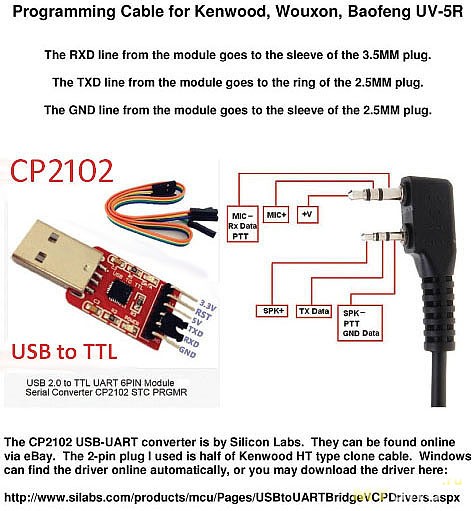
So... we needed the cable and we found this schema:

schema

To build this we would need a USB to 3.3v serial (like the cable I use for La Fonera) and a couple of connectors 2.5 and 3.5 mm audio connectors, wich came out of an old Nokia audio cable and other broken things, plus a 3 pin header, we had it all.

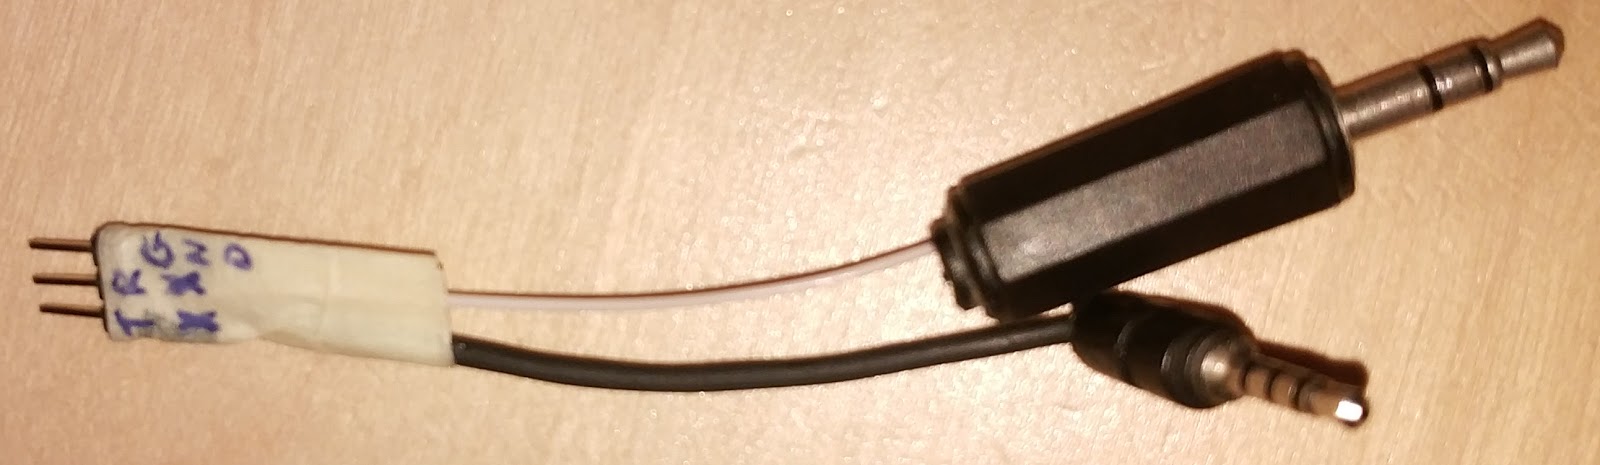
After a bit of soldering we had...

this adaptor

Which seemed ok, but the windows driver for that cable saying... "pl2303hxa phased out since 2012" didn't look ok, and in fact didn't work, we googled to Ruben's github and that solved it, we finally could read the values from the radio and write new ones there :-)

I tried to google some Linux stuff for this products but found none, maybe wine can help here, if I have the time I'll do some tests on this, any better hint?

miércoles, 6 de julio de 2022

Abriendo cerradura de manilla con tapa de acceso no visible

Buenas.

Hace poco tuvimos un problema con una de las manillas de una cerradura, resulta que se habían aflojado los tornillos, pero... los tornillos no se veían, no eran accesibles, estaban ocultos.

Obviamente eso significaba simplemente que había un embellecedor tapando los tornillos, pero el caso era... como se sacaba el embellecedor o que parte de la cerradura desmontar para poder acceder a los tornillos o a desmontar el embellecedor.

Pues bien, luego de darle muchas vueltas, buscar fotos, videos y demás cosas por la red... hicimos lo único que podíamos hacer, darle a la cabeza y luego... desmontar los embellecedores, porque.... tenían que estar como la lógica nos indicaba que tenían que estar, es decir...

El embellecedor estaba metido a presión y hubo que sacarlo con mucho cuidado para intentar dañar lo menos posible la pintura.

Pero al final salió y pudimos apretar los tornillos y solucionar el problema que llevaba meses manifestándose como una holgura.

Y eso es todo, espero que estas fotos sirvan para que otros no se tengan que romper tanto la cabeza como yo mirando videos y fotos que no llevaban a ningún lado, aquí no había agujeros ocultos ni nada por el estilo, solamente presión.

sábado, 12 de marzo de 2022

tcpping-nmap a substitute for tcpping based on nmap

I was about to setup a tcpping based monitoring on smokeping but then I discovered this was based on tcptraceroute which on Debian comes setuid root and the alternative is to use sudo, so, anyway you put it... this runs with root privileges.

I didn't like what I saw, so, I said... couldn't we do this with nmap without needing root?

And so I started to write a little script that could mimic what tcpping and tcptraceroute were outputing but using nmap.

The result is tcpping-nmap which does this. The only little thing is that nmap only outputs miliseconds while the tcpping gets to microseconds.

Hope you enjoy it :-)

martes, 11 de enero de 2022

SUV o la negación de un vehículo urbano deportivo

Está claro que los que acuñaron la etiqueta SUV lo hicieron para vender, y visto lo que se ve en las calles, lo han hecho de miedo.

Han conseguido que se vendan como churros coches más caros, que consumen más, son más inseguros para sus ocupantes y para los atropeyos, ...

El tema es que, hasta que se definió la equiqueta SUV, un coche urbano y deportivo era el Honda Civic, o incluso un Citroën C2, ¿que en que se parecen a un SUV?

En que tienen ruedas, más caras, por cierto, y que desgastan más la carretera, también por su peso y tal claro.

Hace mucho tiempo que quería escribir algo de los SUVs, si me veis conduciendo uno, será que no me ha quedado otra opción, y seguro que no será mío, sino... será que el covid me ha trincado y me ha dejado muy tocado de la cabeza.

No voy a describir todos los problemas que tiene un "SUV" los podéis leer por ahí, pero igual no hace falta, porque cuando vi este video dije... no hacen falta palabras, esto lo explica a la perfección.

https://twitter.com/JamesKPatterson/status/1474089696296906770

viernes, 13 de agosto de 2021

OpenWRT dist-upgrade, or how to update your OpenWRT automatically

I've been thinking in writing this post for a long time and with OpenWRT 21.02 hopefully coming I thought it was the perfect time so that you could benefit from it.

Those of us who run Debian love the way you can go from one version to the new one (Bullseye is coming this weekend, btw) without needing to reinstall the machine each time you update, a simple apt dist-upgrade will take care of everything.

I love Debian, but for the really small things I enjoy OpenWRT a lot and I've always missed the Debian dist-upgrade way of things on OpenWRT.

At work we have a lot of OpenWRT routers, so we had a quite automated way of managing things, so that when we had to update, we did the sysupgrade and then logged on the machine and executed something that installed back all the extra things we needed. It was then that I though... hey, what if we use the sysupgrade.conf thing to protect a service that would be run on the first boot of the device with the new version of OpenWRT and then this service would install all the packages we need?

And that's how the reinstall script (calling it a service would be too much) was born. This script will take care of reinstalling all the things that you tell him to install after a sysupgrade, so, all you need to do is to identify what extra packages you have installed and write the names on your /etc/reinstall.conf file, one package per line, also, if you want a service disabled, you would write its name prepending it with a "-", and that's it.

The only limitation that I've found that would annoy me is that reinstall needs network connection to work, so... if you need some of the extra packages to stablish the network connection (like a 4G connected router wich needs its drivers, a full wpa client to connect with WPA-EAP, ...), reinstall will fail, I suppose I could give an option to predownload the packages but that would need the target version of OpenWRT, so maybe that would mean that maybe reinstall should download the sysupgrade image itself along with the packages and launch the sysupgrade, ... well, who knows, maybe I end up writing a beast, but right now... it needs to be able to have network connection with OpenWRT out of the box to be able to reinstall

This is a /etc/reinstall.conf of one of my machines which runs as an AP, so I don't want dhcp or other stuff, but I want some extra packages to be able to access external storage and things like that:

-dnsmasq -uhttpd -odhcpd nmap diffutils usbutils kmod-usb-storage

BTW: this AP of mine is an ASL26555 with 16MB of RAM which has just been updated from the 19.07 series to 21.02.0-rc4 using reinstall without any problem.

So... you need the reinstall.conf file and we need the script itself, which is at the end of the post, you must save it as /etc/init.d/reinstall and then do a "chmod 755 /etc/init.d/reinstall", but as I told before... we must setup sysupgrade so that reinstall survives after it, so you must add to /etc/sysupgrade.conf at least the three reinstall lines that I have here on this example so that it ends looking something like this:

## This file contains files and directories that should ## be preserved during an upgrade. /etc/firewall.user /etc/crontabs/root /root /etc/init.d/reinstall /etc/rc.d/S99reinstall /etc/reinstall.conf

So... now you have it all setup... when you are going to do a sysupgrade... you must first do a "/etc/init.d/reinstall enable" in order to enable the service, so that it runs when sysupgrade reboots the device, that's when reinstall installs the wanted packages.

The service will log its actions on /root/reinstall.log by default, then disable itself so that it is not run anymore, and then reboot the machine so that it ends up right how you wanted it to be. After that you can log on the machine to see how everything went, and hopefully your log will look something like this:

_______ ________ __ | |.-----.-----.-----.| | | |.----.| |_ | - || _ | -__| || | | || _|| _| |_______|| __|_____|__|__||________||__| |____| |__| W I R E L E S S F R E E D O M ----------------------------------------------------- OpenWrt 21.02.0-rc4, r16256-2d5ee43dc6 ----------------------------------------------------- Downloading 'http://www.google.com' Connecting to 142.250.185.4:80 Writing to '/dev/null' Download completed (14036 bytes) Thu Aug 12 17:29:39 CEST 2021 Downloading https://downloads.openwrt.org/releases/21.02.0-rc4/targets/ramips/rt305x/packages/Packages.gz Updated list of available packages in /var/opkg-lists/openwrt_core Downloading https://downloads.openwrt.org/releases/21.02.0-rc4/targets/ramips/rt305x/packages/Packages.sig Signature check passed. Downloading https://downloads.openwrt.org/releases/21.02.0-rc4/packages/mipsel_24kc/base/Packages.gz Updated list of available packages in /var/opkg-lists/openwrt_base Downloading https://downloads.openwrt.org/releases/21.02.0-rc4/packages/mipsel_24kc/base/Packages.sig Signature check passed. Downloading https://downloads.openwrt.org/releases/21.02.0-rc4/packages/mipsel_24kc/luci/Packages.gz Updated list of available packages in /var/opkg-lists/openwrt_luci Downloading https://downloads.openwrt.org/releases/21.02.0-rc4/packages/mipsel_24kc/luci/Packages.sig Signature check passed. Downloading https://downloads.openwrt.org/releases/21.02.0-rc4/packages/mipsel_24kc/packages/Packages.gz Updated list of available packages in /var/opkg-lists/openwrt_packages Downloading https://downloads.openwrt.org/releases/21.02.0-rc4/packages/mipsel_24kc/packages/Packages.sig Signature check passed. Downloading https://downloads.openwrt.org/releases/21.02.0-rc4/packages/mipsel_24kc/routing/Packages.gz Updated list of available packages in /var/opkg-lists/openwrt_routing Downloading https://downloads.openwrt.org/releases/21.02.0-rc4/packages/mipsel_24kc/routing/Packages.sig Signature check passed. Downloading https://downloads.openwrt.org/releases/21.02.0-rc4/packages/mipsel_24kc/telephony/Packages.gz Updated list of available packages in /var/opkg-lists/openwrt_telephony Downloading https://downloads.openwrt.org/releases/21.02.0-rc4/packages/mipsel_24kc/telephony/Packages.sig Signature check passed. Disabling -dnsmasq Disabling -uhttpd Disabling -odhcpd Installing nmap Installing nmap (7.80-3) to root... Downloading https://downloads.openwrt.org/releases/21.02.0-rc4/packages/mipsel_24kc/packages/nmap_7.80-3_mipsel_24kc.ipk Installing libpcap1 (1.9.1-3) to root... Downloading https://downloads.openwrt.org/releases/21.02.0-rc4/packages/mipsel_24kc/base/libpcap1_1.9.1-3_mipsel_24kc.ipk Installing libstdcpp6 (8.4.0-3) to root... Downloading https://downloads.openwrt.org/releases/21.02.0-rc4/targets/ramips/rt305x/packages/libstdcpp6_8.4.0-3_mipsel_24kc.ipk Installing zlib (1.2.11-3) to root... Downloading https://downloads.openwrt.org/releases/21.02.0-rc4/packages/mipsel_24kc/base/zlib_1.2.11-3_mipsel_24kc.ipk Installing libpcre (8.44-3) to root... Downloading https://downloads.openwrt.org/releases/21.02.0-rc4/packages/mipsel_24kc/base/libpcre_8.44-3_mipsel_24kc.ipk Configuring libpcre. Configuring libpcap1. Configuring libstdcpp6. Configuring zlib. Configuring nmap. Installing diffutils Installing diffutils (3.7-3) to root... Downloading https://downloads.openwrt.org/releases/21.02.0-rc4/packages/mipsel_24kc/packages/diffutils_3.7-3_mipsel_24kc.ipk Configuring diffutils. Installing usbutils Installing usbutils (013-2) to root... Downloading https://downloads.openwrt.org/releases/21.02.0-rc4/packages/mipsel_24kc/packages/usbutils_013-2_mipsel_24kc.ipk Installing librt (1.1.24-3) to root... Downloading https://downloads.openwrt.org/releases/21.02.0-rc4/targets/ramips/rt305x/packages/librt_1.1.24-3_mipsel_24kc.ipk Installing libusb-1.0-0 (1.0.24-4) to root... Downloading https://downloads.openwrt.org/releases/21.02.0-rc4/packages/mipsel_24kc/base/libusb-1.0-0_1.0.24-4_mipsel_24kc.ipk Installing libevdev (1.10.1-1) to root... Downloading https://downloads.openwrt.org/releases/21.02.0-rc4/packages/mipsel_24kc/packages/libevdev_1.10.1-1_mipsel_24kc.ipk Installing libudev-zero (0.4.5-2) to root... Downloading https://downloads.openwrt.org/releases/21.02.0-rc4/packages/mipsel_24kc/packages/libudev-zero_0.4.5-2_mipsel_24kc.ipk Installing usbids (0.347-1) to root... Downloading https://downloads.openwrt.org/releases/21.02.0-rc4/packages/mipsel_24kc/packages/usbids_0.347-1_mipsel_24kc.ipk Configuring libevdev. Configuring librt. Configuring libusb-1.0-0. Configuring libudev-zero. Configuring usbids. Configuring usbutils. Installing kmod-usb-storage Installing kmod-usb-storage (5.4.137-1) to root... Downloading https://downloads.openwrt.org/releases/21.02.0-rc4/targets/ramips/rt305x/packages/kmod-usb-storage_5.4.137-1_mipsel_24kc.ipk Installing kmod-scsi-core (5.4.137-1) to root... Downloading https://downloads.openwrt.org/releases/21.02.0-rc4/targets/ramips/rt305x/packages/kmod-scsi-core_5.4.137-1_mipsel_24kc.ipk Configuring kmod-scsi-core. Configuring kmod-usb-storage. Everything went Ok, reinstall has finished without errors.

I guess, that's all I have to say, hope you enjoy it, keep in mind that embedded devices are always tricky and that if your machine is not stable... you should probably not do automatic things like this on it, as always I take no resposability on anything, use it at your own risk, as for me, I trust OpenWRT so much that I have just reinstalled my ASL26555 from outside using it and everything went Ok ;-)

So... here is reinstall

Edit: Originally I had pasted the code in the page, but that was an error due to how bad blogger works, so... now I have published it on github and added the link to it. Also a quick note... reinstall can also be run or rerun after the machine is upgraded if you forgot to enable it before the sysupgrade or if something went wrong, like conectivity problems or similar, simply do:

/etc/init.d/reinstall start

domingo, 9 de mayo de 2021

Flashing a Samsung stock ROM using heimdall from the command line.

I've read many times how to flash a Samsung official rom from Windows using Samsung's official tools and some other times I've read complex ways to do it using the Heimdall's grafical interface, ... but I never felt any of this ways was for me.

Fortunately I always flash custom ROMs instead, so I never had the need to flash a stock one, till recently, when I wanted to test andOTP on old Android versions, that's when I wanted to install the ancient stock versions of a couple of Samsung phones, and luckily I came to a quick commandline script that did it all for me.

WARNING: this procedure will wipe out all your data on the device in a way that you won't be able to recover it, I'm not resposable for any data loss or any damage to the device that any of the things I describe here may cause to the devices.

First of all you must unpack the stock rom, typically a zip file that inside has a whatever.tar.md5 files which are really tar files, not md5 ones, so, you untar the tar.md5 files using for example:

for i in *.md5;do tar -xvf $i && rm $i;done and you get the images of the phone's partitions, usually recovery.img, modem.bin, boot.img, ... or compressed, ending on .lz4, if so, you must uncompress them using for example: for i in *.lz4;do unlz4 $i && rm -f $i;done you can now remove the .tar.md5 files and leave just the phone's partitions files.

So... if you have clear that you are going to delete all your data on the phone and want to continue, I assume you have made a good backup of your data and you have verified that the backup is ok, or that you don't mind loosing it all. In any way...

You must start by wiping your data partition from your recovery or from the system itself by doing a factory reset and then going directly do the bootloader. The easiest way is by selecting reset to bootloader on the recovery after wiping data, or rebooting pressing the bootloader key convination for your device, but making sure that you didn't boot into the system after doing the wiping.

If you are sure you have formated data and booted directly to bootloader, you may need to confirm on bootloader that you want to "Continue" to flash your rom, that way you'll get to the "Downloading..." droid.

Now that we are on the bootloader on download mode we do:

heimdall print-pit --no-reboot > pit

and after we have downloaded the pit file:

heimdall flash $(for i in *.*;do grep -B 1 " $i\$" pit|tr '\n' ' ';echo;done|sed "s/.*ame: \([^ ]*\) .*ame: \(.*\)/--\1 \2/"|tr '\n' ' ')

And you are done. The script will flash all the partitions that are included on the stock rom and after that it will reboot for the system to do its job after flashing, so... it will be a first time boot that will take a while, but that's it.

Just some side notes, using --no-reboot and then --resume has never really worked for me, maybe it was a problem with heimdall's version or my devices or whatever, in those cases the second heimdall command will fail, you must reboot to booloader again (without going to system, otherwise you'll have to format data again) and execute the flash command again without the --resume.

lunes, 3 de mayo de 2021

Windows and Linux software Raid dual boot BIOS machine

One could think that nowadays having a machine with software raid doing dual boot should be easy, but... my experience showed that it is not that easy.

Having a Windows machine do software raid is easy (I still don't understand why it doesn't really work like it should, but that is because I'm used to Linux software raid), and having software raid on Linux is also really easy. But doing so on a BIOS booted machine, on mbr disks (as Windows doesn't allow GPT on BIOS) is quite a pain.

The problem is how Windows does all this, with it's dynamic disks. What happens with this is that you get from a partitioning like this:

/dev/sda1 * 2048 206847 204800 100M 7 HPFS/NTFS/exFAT /dev/sda2 206848 312580095 312373248 149G 7 HPFS/NTFS/exFAT /dev/sda3 312580096 313165823 585728 286M 83 Linux /dev/sda4 313165824 957698047 644532224 307,3G fd Linux raid autodetect

To something like this:

/dev/sda1 63 2047 1985 992,5K 42 SFS /dev/sda2 * 2048 206847 204800 100M 42 SFS /dev/sda3 206848 312580095 312373248 149G 42 SFS /dev/sda4 312580096 976769006 664188911 316,7G 42 SFS

These are the physical partitions as seen by fdisk, logical partitions are still like before, of course, so there is no problem in accesing them under Linux or windows, but what happens here is that Windows is using the first sectors for its dynamic disks stuff, so... you cannot use those to write grub info there :-(

So... the solution I found here was to install Debian's mbr and make it boot grub, but then... where do I store grub's info?, well, to do this I'm using a btrfs /boot which is on partition 3, as btrfs has room for embedding grub's info, and I setup the software raid with ext4 on partition 4, like you can see on my first partition dump. Of course, you can have just btrfs with its own software raid, then you don't need the fourth partition or anything.

There are however some caveats on doing all this, what I found was that I had to install grub manually using grub-install --no-floppy on /dev/sda3 and /dev/sdb3, as Debian's grub refused to give me the option to install there, also... several warnings came as a result, but things work ok anyway.

One more warning, I did all this on Buster, but it looks like for Grub 2.04 which is included on Bullseye, things have gotten a bit bigger, so at least on my partitions there was no room for it, so I had to leave the old Buster's grub around for now, if anybody has any ideas on how to solve this... they are welcome.

miércoles, 20 de mayo de 2020

Trabajando en remoto sobre Debian

La situación actual nos ha llevado a muchos a trabajar en remoto, algo para lo que hay muchas opciones, hablemos de alguna de ellas.

SSH

Es el sistema de acceso remoto por excelencia, lo usamos todos desde siempre, o al menos desde que la seguridad en la red importa, aunque no siempre fuera así, los ancianos del lugar usábamos el telnet, pero mejor no hablar de temeridades, no? ;-)

El secure shell como su propio nombre indica está diseñado para acceder a un shell, es decir, para acceso remoto a un entorno modo texto, pero como ya sabréis permite hacer túneles de todo tipo, desde puertos hasta forwarding de clientes X.

Si bien el SSH nos permite acceder a nuestros clientes X y traerlos hasta el servidor local de nuestro ordenador en casa, resulta que las X no están diseñadas para que el cliente y el servidor estén separados por las latencias de una wan por medio, por lo que aunque tengamos 1 giga de ancho de banda, nuestras aplicaciones X en remoto irán muy lentas, por eso... veamos que podemos utilizar para la parte gráfica...

x2go

Seguro que es el sistema más currado y más complejo para acceso remoto, soporta no sólo Linux, pero... si lo probáis veréis que hace muchas cosas por su cuenta sin contárnoslas, así que uno no deja de preguntarse... ¿para qué es todo esto? Lo tenemos soportado en Debian con paquetes tanto para hacer de servidor como para cliente, aunque ya os digo que a mi me pareció demasiado complejo y poco transparente.

Sin embargo si miramos debajo del capó vemos que utiliza la tecnología de NX que me parece más sencilla y entendible.

NX

Se trata de una tecnología que nos permitirá la utilización de aplicaciones nativas X tal cual, se basa en la proxificación de los clientes X de modo que los eventos no tengan tanta latencia y por lo tanto todo vaya mucho más fluido. Además añadiremos un servidor X en el lado remoto que nos permitirá tener una mejor respuesta y sesiones permanentes.

Su uso es sencillo, veamos un ejemplo, la idea es que accedemos al sistema remoto via ssh -L 4008:localhost:4008 host.remoto (forwardeamos el puerto 4008 que usaremos para el proxy de NX que correremos con :8 o sea usando el puerto 4008) y allí ejecutamos un proxy al que nos conectamos desde localhost a través de este puerto que hemos forwardeado. Esa es la parte de proxificado, pero vamos a añadir el agente que lo que hace es añadir un servidor X local sobre que lanzaremos las aplicaciones X y que nos dará también una sesión permanente que nos permite desconectarnos y conectarnos cuando queramos, veamos esto:

Remoto: nxproxy -C :8 & Local: nxproxy -S localhost:8 & Remoto: nxagent -display nx/:8 -geometry 1276x976 :9 & DISPLAY=:9 startlxqt

En el ejemplo arrancamos el lxqt, pero se puede arrancar lo que sea. Esta sesión sera permanente, ya que como dijimos estamos arrancando un servidor X en el equipo remoto, en este caso el DISPLAY será :9, contra el que irán las aplicaciones X. Aunque apaguemos el equipo local, se corten las comunicaciones o lo que sea, podremos reconectar. Para esto sólo hay que rearrancar las partes del proxy remoto y local y luego avisar al nxagent de que queremos que nos vuelva a mandar el display utilizando por ejemplo:

killall nxagent -HUP

VNC

Que decir de VNC, ha estado ahí desde hace muchos años.

Tenemos el servidor al estilo windows, en el paquete x11vnc que podemos arrancar así:

x11vnc -rfbport 5900 -bg -o %HOME/.vnc/x11vnc.log.%VNCDISPLAY -rfbauth ~/.vnc/passwd -display :0 o el tigervnc-scraping-server que al igual que el anterior nos permitirá acceder vía cliente VNC a unas X que estén corriendo, aunque ahora tenemos también la extensión de X tigervnc-xorg-extension que nos dará la misma funcionalidad pero de una manera mucho más eficiente. Estos están bien para ver lo que hay en ejecución en la pantalla de un equipo y por ejemplo ofrecer ayuda remota.

Además tenemos el tigervnc-standalone-server y el tightvncserver que lo que nos permiten es tener todas las sesiones X que queramos (ya que no van atadas a nuestra gráfica ni nada) y accederlas en remoto vía VNC, y por supuesto varios clientes específicos de vnc como tigervnc-viewer y xtightvncviewer además de otros que soportan VNC y otros protocolos.

El handicap de siempre del VNC es que todo va en claro, nada va cifrado, así que necesita sí o sí de SSH o similar para cifrar los datos.

RDP

Este protocolo diseñado por Microsoft tiene ahora tanto servidores como clientes para Linux, requiere mucho menos ancho de banda que VNC y soporta diversos tipos de cifrado, tanto cifrado propio como incluso una capa de TLS.

Al igual que en el caso de VNC tenemos también servidores para acceso a un servidor X ya existente, como el freerdp-shadow-cli en el paquete freerdp2-shadow-x11. Lo podemos lanzar con esta orden para acceder a las X corriendo en :0:

DISPLAY=:0 freerdp-shadow-cli /port:12345

Ya sabéis, como en el caso del VNC, es muy útil para ayuda remota. Si bien es conveniente tener en cuenta este bug ya que hace que nofuncione la autenticación mientras que no lo arreglemos, así que o bien recompilamos o bien añadimos el parámetro -auth, pero entonces cualquiera que tenga acceso al puerto podrá tomar control de la sesión X.

También tenemos clientes como el clásico rdesktop o el xfreerdp del paquete freerdp2-x11 y otros clientes que soportan VNC, RDP y más, como vinagre, de GNOME o remmina.

Pero si lo que queremos es un acceso remoto a un entorno de trabajo Linux persistente tendremos que fijarnos en xrdp, todo un servidor rdp para dar acceso a tantas sesiones de escritorios Linux como queramos, estas sesiones serán permanentes y podremos conectarnos y desconectarnos de las mismas cuando queramos, además soporta sonido, aunque eso requerirá que compilemos los módulos siguiendo estas instrucciones, la reproducción de sonido es estándar, por lo que funcionará en cualquier cliente, pero si queremos mandar nuestro micro al server deberemos utilizar por ejemplo el paquete de rdesktop de buster (lo he probado y funciona) o algún otro compatible, ya que han hecho una implementación no estándar :-(

No voy a hablar de más protocolos (que los hay) pero si quería hablar de algo que me parece muy interesante, un potente cliente web de todos estos protocolos y más...

Guacamole

Esto si que no lo tenemos en Debian, aunque hubo algún intento de paquetización antiguo y probablemente os podáis encontrar todavía por ahí los paquetes viejos, no os los aconsejo porque tienen varios bugs de seguridad. Este cliente es bastante complejo, con diversas partes, basado en java, requiere al menos un tomcat para mover el servidor, ... pero a cambio tendremos acceso a servidores RDP, VNC, ssh, ... con seguridad de dos factores en varios estilos y colores y el cliente no necesitará nada más que un navegador web, algo que nos puede aligerar los requisitos para los trabajadores que tengan que acceder en remoto.

Bueno, eso es todo lo que se ocurre ahora mismo, podéis sugerir otras ideas en los comentarios.

Saludos.

sábado, 23 de noviembre de 2019

ING y PSD2

ING parece que quiere que todos los clientes tengan su app instalada y que operen a través de ella. La verdad, es mucha la gente que no trata su móvil como un elemento confiable, no le gusta tener nada que tenga que ver con los bancos en el móvil, tengo que reconocer que yo soy una de esas personas, por eso me he quedado de piedra cuando me he enterado de que ING ha mandado correos este día 20 a sus usuarios diciendo que o bien se instalan su app o no podrán operar a partir del día 25.

O Sea, resumiendo, que ING ha dado 5 días a sus clientes para que se instalen la app :-O Por lo que he podido leer luego parece ser que la cosa ya viene de antes, así que entiendo que este correo será la última advertencia antes de cortarles el acceso.

Me he puesto a analizar un poco el tema este de la app de ING y me pregunto hasta que punto cumple con la PSD2, es decir, la PSD2 se supone que es para hacer más seguro el acceso, todo el mundo habla de un segundo factor de autenticación, lo que está muy bien, entiendo que tenga que tener una APP porque no quieren pagar por los SMS, pero lo que no entiendo es que para entrar en dicha APP tenga que meter todos los factores de autenticación que tengo con el banco, que en el caso de ING vienen siendo el DNI y la fecha de nacimiento (dos datos que si bien no siempre son públicos son muy fáciles de obtener) además de una clave de 6 caracteres numéricos.

Hace años que me pregunto que tipo de gente lleva la seguridad de los bancos, con ING ya he tenido mis problemas, dado que el correo que uso sólo con ellos acabó en manos de spammers, como le ocurrió a alguna otra persona que también contactó con ING y que obtuvo la misma respuesta que yo, o sea, que no era culpa de ING, que ellos no habían sufrido ningún tipo de fuga de información.

Todo esto es un despropósito monumental, tanto es así que no sé que más añadir, así que expondré yo como haría que la APP fuera un segundo factor de autenticación válido y seguro para que la gente que como yo no nos fiamos de la seguridad de nuestros juguetes, no huyéramos del banco por este tipo de acciones temerarias.

La app no es el problema, el problema es que te pide los mismos datos que la web, por lo que no sirve para mejorar la seguridad, al contrario, la debilita. Pero si en lugar de pedirte la clave y todo esto, hacemos que nos pida sólo el DNI, y que luego tengas que introducir en ella un código que se nos de en la web o similar, dejando esta instalación de la APP unida a ese usuario (con criptografía fuerte y tal y tal), tendremos un canal seguro para que el banco pueda mandar a este usuario su segundo factor sin gastar un duro y sin que este usuario tenga que poner en jaque la seguridad de su cuenta por la instalación de la app en un sistema que al menos en mi caso considero menos seguro que los ordenadores donde accedo a los bancos.

En fin, señores de ING, parece mentira que lleven tanto tiempo en esto y sepan tan poco de sus clientes o de la gente en general, mezclar los juguetes con la seguridad electrónica... no parece una buena idea, y mucha gente considera que sus móviles están bien para jugar, divertirse, ... pero ya tienen demasiados datos nuestros como para aún encima poner los del banco, mala idea, denle otra pensada al tema y luego hablamos.

Saludos.

martes, 10 de septiembre de 2019

mdadm: how to add a disk to do a replacement

When playing with two disks raid 1 devices it is typical that when one drive fails you just remove it and replace it with a new one and that's it.
But... what if the drive that is left finds an error when you are reconstructing the array? Then... you have a problem.
So when replacing a disk that is starting to fail... it would be better to use the two disks instead of just discarding one.
Luckily the Linux software raid system allows you to add a third disk and sync the array to this disk from the other two, this way, you have two disks to feed the new one and if you are lucky enough you get a good copy of each of the sectors of the raid 1 array to finish the job.
The commands to do this would be... first to add the new disk:
mdadm --add /dev/md1 /dev/sdc1 which just adds it as an spare, but then you tell Linux you want it to use the three disks as active disks like this: mdadm --grow /dev/md1 -f -n 3 When this finishes you should have all the three disks on the array being active, or maybe you get failed drives in the way, but hopefully you get the new drive with a full copy of the data, so... all you have to do is get back to the two disks setup, for this if you don't have the failed drive marked as such... you fail it: mdadm --fail /dev/md1 /dev/sda1 and then you remove it from the array like this: mdadm --remove /dev/md1 /dev/sda1 and put the array in the two disks mode like it was before: mdadm --grow /dev/md1 -f -n 2 And that's it :-)
All this commands were tested on a Debian 10 (Buster) setup, hope they help you.
Regards.

miércoles, 31 de julio de 2019

Tiempos de "fontanería" (grifos termostáticos y más)

Parece que estamos en esa época del año en la que me toca lidiar con este tipo de cosas, esta vez ha tocado cambiar un grifo de cisterna, cambiar un grifo de bañera por uno monomando y por último "arreglar" un grifo termostático.

Si el finde pasado disfruté de la ducha en la bañera de la aldea luego de haber sustituido el viejo grifo por un monomando que además va a evitar que tiremos agua y hacer que cualquiera pueda cerrarlo, no os quiero contar lo que disfruté de la ducha de hoy luego de llevar una temporada casi escaldándome en la ducha de casa porque el termostático no funcionaba como debiera.

No os voy a mentir, el tema del termostático me tenía un poco acojonadillo porque nunca había desmontado ninguno, este era en una columna de ducha que uso a diario, por lo que si tardaba en conseguir repuestos me quedaba sin servicio en ese baño, en fin... que luego de ver unos videos en youtube explicando como se limpia, como se desmontan por dentro (este se parece bastante al mío) y sobre todo ver en una columna como se saca y que en aliexpress (no se me había ocurrido) hay bastantes modelos genéricos...

Ayer me dispuse a ello, saqué el cartucho, lo desmonté, metí todas las piezas en agua con vinagre al 50% (respetando lo de la media hora máximo para no estropear las juntas) y luego cepillo de dientes y tal para quitar toda la suciedad de 10 años de uso. Luego montar y dar vaselina a todo y probarlo, milagrosamente eso fue todo, ¡funcionaba!

Esta mañana por fin pude darme un ducha un poco fresquita que acompañase al veranillo y tal, no veas como se agradeció el trabajo de ayer y sobre todo lo poco que costó al final eso que me parecía tan difícil, la verdad es que pensaba que lo mínimo iba a ser cambiar el cartucho, pero al final ya véis, con una limpieza.... listo.

martes, 4 de junio de 2019

Fallos en el rutado de MasMovil y también en su ZTE F680

Desde hace un tiempo soy cliente de la fibra de MasMovil, desde entonces mi router es un ZTE F680 y he venido sufriendo ciertos problemas tanto en la conexión de MasMovil como en el propio router.

Sobre los problemas de MasMovil, se trata de un problema de rutado entre equipos en la red de MasMovil que están fuera de su CGNAT (Carrier Grade NAT), es decir, los que han solicitado tener una IP directa de Internet en su router y no estar detrás de los firewalls de MasMovil.

Entre algunas de estas IPs de MasMovil (no en todas, pero sí entre algunas) se pierde gran parte del tráfico. Por ejemplo, ahora mismo tengo la IP 46.6.0.131 y hace un rato la 46.6.5.195, pues bien, desde estas un ping a 46.6.11.88 o a 46.6.11.223 presenta una pérdida del orden del 90% como se puede ver:
PING 46.6.11.223 (46.6.11.223) 56(84) bytes of data. 64 bytes from 46.6.11.223: icmp_seq=12 ttl=61 time=45.8 ms 64 bytes from 46.6.11.223: icmp_seq=36 ttl=61 time=46.1 ms 64 bytes from 46.6.11.223: icmp_seq=41 ttl=61 time=44.8 ms ^C --- 46.6.11.223 ping statistics --- 45 packets transmitted, 3 received, 93.3333% packet loss, time 998ms rtt min/avg/max/mdev = 44.786/45.542/46.052/0.572 ms He intentado contactar con MasMovil sobre este problema, que evita que podamos hacer una conexión TCP de entre estas IPs de clientes de MasMovil, sin conseguir nada (no conseguí llegar a un nivel de soporte suficientemente alto, sólo se limitaron a comprobar que mi linea estaba bien, cosa que ya sé, no pierdo tráfico contra Inet, sólo contra ciertas IPs de MasMovil).

Por el contrario, el problema del propio router acabo de "solventarlo". En realidad se trata de un workaround, pero vamos, ya estoy contento.

El problema del F680, al menos en las versiones ZTEGF6804P1T6 y ZTEGF6804P1T13 es que cuando defines un port forwarding y luego desde la red interna intentas acceder al puerto redireccionado en la IP externa, la primera vez funciona sin problema, pero la segunda se queda como si se le estuviera haciendo un DROP, y así consecutivamente, es decir, funcionan como la mitad de las conexiones.

La forma que se me ha ocurrido de evitar este problema, que por ejemplo, hacía que no pudiera acceder a mi propia web desde mi propia conexión, es utilizar la DMZ en lugar de hacer un port forwarding, esto es matar moscas a cañonazos, pero al menos no parece causar esos problemas, claro está que deberemos activar firewall en la máquina que pongamos en la DMZ ya que dejará de estar protegida por el firewall del ZTE.

Espero que esto último os ayude a solucionar los problemas que podáis tener con vuestro ZTE F680, yo hasta ahora ha sido el único problema que he tenido, si consiguiera que MasMovil revisase el problema de los rutados y lo solucionase ya sería la monda :-)

sábado, 7 de enero de 2017

061 en Galicia, teléfono equivalente

Sigo sen entender o tema de non dar os teléfonos equivalentes dos números especiais en calquera servicio, así a xente ou a empresa que presta o servicio están suxeitas ós cargos que fagan as operadoras, mentres que se se dan os números equivalentes as chamadas pasan a estar incluídas dentro das tarifas que temos contratadas cos nosos operadores, cun coste normalmente inferior ou gratis.

Un exemplo deste tipo é o teléfono 061, que en Galicia o xestiona a Fundación Pública Urxencias Sanitarias de Galicia que na sua web espefica un formulario de contacto (se non tes presa) e os teléfonos 061 e 902 400 116 como forma de contacto se temos presa, foi precisamente este último teléfono o que me levou á entrada de Danae en no más 900 onde se especifica o 981953400 como número equivalente ó 061 en Galicia, o probei e funciona perfectamente.

En fin... esperemos que pouco a pouco os organismos e empresas que utilizan todavía os 901/2 e outros números especiais vaian dando os equivalentes para poder cortar co negocio este dos números especiais